GlusterFS + Go の開発環境を Docker で構築
バックアップ開発部の y-okubo と申します。
今回は「gogfapi を使った簡単な API Server」を作るにあたり、Docker を使って Go の開発環境を構築した手順を紹介させていただきます。
「gogfapi を使った〜」は弊社が毎年行っている開発合宿のお題として選んだ物で(社内的にはもうちょっとクールなお題にしています)、そちらは別の機会に紹介したいと思います。
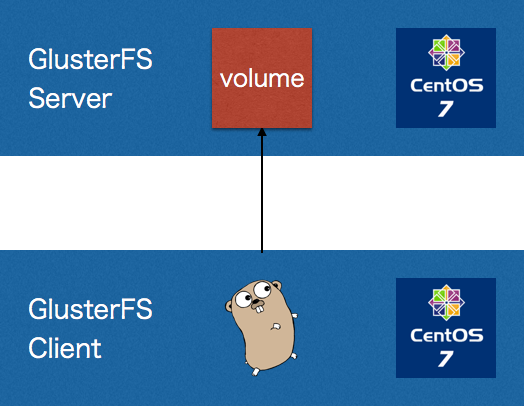
構成
開発環境なのでデータの永続化は考慮していません。

サーバ
当初は DockerHub でイメージを探したのですが、イメージを生成すると GlusterFS のインストールで失敗する事が多いので自作することにしました。
Dockerfile はこんな感じです(途中の root:password はとても意識が低いので適宜書き換えてご利用ください)。
FROM centos

ENV container docker

# Install require packages
RUN yum --setopt=tsflags=nodocs -y update
RUN yum --setopt=tsflags=nodocs -y install wget nfs-utils openssh-server vim
RUN yum -y swap -- remove fakesystemd -- install systemd systemd-libs

# Added to enable systemd. Reference: http://developerblog.redhat.com/2014/05/05/running-systemd-within-docker-container/
RUN yum -y update; yum clean all; \
(cd /lib/systemd/system/sysinit.target.wants/; for i in *; do [ $i == systemd-tmpfiles-setup.service ] || rm -f $i; done); \
rm -f /lib/systemd/system/multi-user.target.wants/*;\
rm -f /etc/systemd/system/*.wants/*;\
rm -f /lib/systemd/system/local-fs.target.wants/*; \
rm -f /lib/systemd/system/sockets.target.wants/*udev*; \
rm -f /lib/systemd/system/sockets.target.wants/*initctl*; \
rm -f /lib/systemd/system/basic.target.wants/*;\
rm -f /lib/systemd/system/anaconda.target.wants/*;

# Add epel repository
RUN wget http://dl.fedoraproject.org/pub/epel/7/x86_64/e/epel-release-7-6.noarch.rpm
RUN rpm -ivh epel-release-7-6.noarch.rpm

# Install GlusterFS packages
RUN wget http://download.gluster.org/pub/gluster/glusterfs/3.7/LATEST/EPEL.repo/glusterfs-epel.repo -O /etc/yum.repos.d/glusterfs-epel.repo
RUN yum -y update
RUN yum --setopt=tsflags=nodocs --enablerepo=epel -y install glusterfs glusterfs-server glusterfs-fuse glusterfs-geo-replication glusterfs-cli glusterfs-api glusterfs-api-devel glusterfs-devel
RUN yum --setopt=tsflags=nodocs --enablerepo=epel -y install attr iputils iproute
RUN yum clean all

RUN echo 'root:password' | chpasswd
VOLUME [ “/sys/fs/cgroup” ]

EXPOSE 111 245 443 24007 2049 8080 6010 6011 6012 38465 38466 38468 38469 49152 49153 49154 49156 49157 49158 49159 49160 49161 49162

RUN systemctl disable nfs-server.service
RUN systemctl enable rpcbind.service
RUN systemctl enable sshd.service
RUN systemctl enable glusterd.service
CMD ["/usr/sbin/init"]

COPY ./startup.sh /var/startup.sh
RUN chmod +x /var/startup.sh
RUN echo /var/startup.sh >> /root/.bashrc
ポイントは
- EPEL レポジトリを追加
startup.shを実行
しているところでしょうか。
GlusterFS のインストールに失敗していたのが yum install あたりだったので、自分で EPEL レポジトリを追加しています。
startup.sh の内容についてはこの後に説明します。
その他の内容は GlusterFS official docker image を参考にしています。
startup.sh の内容は以下になります。
#!/bin/bash

# Create volume
mkdir /var/gfs_srv_vol
gluster peer probe $HOSTNAME
gluster volume create gfs_volume $HOSTNAME:/var/gfs_srv_vol force
gluster volume start gfs_volume
gluster volume quota gfs_volume enable

# Mount volume
mkdir /var/gfs_cli_vol
mount -t glusterfs -o acl $HOSTNAME:/gfs_volume /var/gfs_cli_vol
こちらでは GlusterFS のボリューム作成とローカルマウントを行っています。
Dockerfile の中の RUN で実行したかったのですが、$HOSTNAME 環境変数を使いたかったのでシェルスクリプトで実行するようにしてあります。
クライアント側
サーバ側とほぼ一緒の Dockerfile になります(こちらも途中の root:password はとても意識が低いので適宜書き換えてご利用ください)。
FROM centos

ENV container docker

# Install require packages
RUN yum --setopt=tsflags=nodocs -y update
RUN yum --setopt=tsflags=nodocs -y install wget nfs-utils openssh-server vim
RUN yum -y swap -- remove fakesystemd -- install systemd systemd-libs

# Added to enable systemd. Reference: http://developerblog.redhat.com/2014/05/05/running-systemd-within-docker-container/
RUN yum -y update; yum clean all; \
(cd /lib/systemd/system/sysinit.target.wants/; for i in *; do [ $i == systemd-tmpfiles-setup.service ] || rm -f $i; done); \
rm -f /lib/systemd/system/multi-user.target.wants/*;\
rm -f /etc/systemd/system/*.wants/*;\
rm -f /lib/systemd/system/local-fs.target.wants/*; \
rm -f /lib/systemd/system/sockets.target.wants/*udev*; \
rm -f /lib/systemd/system/sockets.target.wants/*initctl*; \
rm -f /lib/systemd/system/basic.target.wants/*;\
rm -f /lib/systemd/system/anaconda.target.wants/*;

# Add epel repository
RUN wget http://dl.fedoraproject.org/pub/epel/7/x86_64/e/epel-release-7-6.noarch.rpm
RUN rpm -ivh epel-release-7-6.noarch.rpm

# Install GlusterFS packages
RUN wget http://download.gluster.org/pub/gluster/glusterfs/3.7/LATEST/EPEL.repo/glusterfs-epel.repo -O /etc/yum.repos.d/glusterfs-epel.repo
RUN yum -y update
RUN yum --setopt=tsflags=nodocs --enablerepo=epel -y install glusterfs glusterfs-fuse glusterfs-cli glusterfs-api glusterfs-api-devel glusterfs-devel
RUN yum --setopt=tsflags=nodocs --enablerepo=epel -y install attr iputils iproute
RUN yum clean all

RUN echo 'root:password' | chpasswd
VOLUME [ “/sys/fs/cgroup” ]

EXPOSE 111 245 443 24007 2049 8080 6010 6011 6012 38465 38466 38468 38469 49152 49153 49154 49156 49157 49158 49159 49160 49161 49162

RUN systemctl disable nfs-server.service
RUN systemctl enable rpcbind.service
RUN systemctl enable sshd.service
CMD ["/usr/sbin/init"]

RUN yum --setopt=tsflags=nodocs -y groupinstall "Development Tools"
RUN wget https://storage.googleapis.com/golang/go1.6.2.linux-amd64.tar.gz
RUN tar -C /usr/local -xzf go1.6.2.linux-amd64.tar.gz

COPY ./hello.c /root/hello.c

RUN mkdir -p /root/go/bin \
  && echo 'export GOROOT=/usr/local/go' >> /root/.bashrc \
  && echo 'export GOPATH=/go/path' >> /root/.bashrc \
  && echo 'export GOBIN=/go/bin' >> /root/.bashrc \
  && echo 'export PATH=$PATH:$GOROOT/bin:$GOBIN' >> /root/.bashrc
こちらは最後の方で Go 開発環境のインストールと設定を行っています。
Go のソースコードはローカルマシン側に置いて、コンテナ起動時にマウントして参照できるようにしています。
イメージ生成
サーバ側
$ docker build -t glusterfs-server server
クライアント側
$ docker build -t glusterfs-client client
コンテナ起動
サーバ側
$ docker run --privileged -tid -p 20022:22 --hostname gfserver --name gfserver glusterfs-server
--privileged で権限を与えて SELinux 等の影響を受けないようにしています。
クライアント側
$ docker run --privileged -tid -p 20023:22 -p 8080:8080 -v /Users/y-okubo:/go/path --link gfserver:server --hostname gfclient --name gfclient glusterfs-client
--link で先ほど起動したコンテナを参照できるようにしてあります。
コンテナへ SSH ログイン
サーバ側
$ ssh -o StrictHostKeyChecking=no -o UserKnownHostsFile=/dev/null -p 20022 root@localhost
クライアント側
$ ssh -o StrictHostKeyChecking=no -o UserKnownHostsFile=/dev/null -p 20023 root@localhost
セキュリティ上よろしくないのですが、毎回 OpenSSH の警告が出るのを抑止しています。
クライアント→サーバの疎通確認(libgfapi 経由でのアクセス)
クライアント側に SSH ログインして、イメージ作成時に用意(Dockerfile にて指定)した hello.c をビルド・実行します。
hello.c のソースは以下になります。
#include <stdlib.h>
#include <stdio.h>
#include <string.h>
#include <glusterfs/api/glfs.h>

int main (int argc, char** argv) {
    const char *gfserver = "server";
    const char *gfvol = "gfs_volume";

    int ret;
    glfs_t *fs;
    glfs_fd_t *fd;

    fs = glfs_new(gfvol);   // Virtual filesystem type struct
    glfs_set_volfile_server (fs, "tcp", gfserver, 0);
    ret = glfs_init (fs);
    if (ret) {
        printf( "Failed to connect server/volume: %s/%s\n", gfserver, gfvol );
        exit(ret);
    }

    char *greet = "Hello, Gluster!\n";
    fd = glfs_creat(fs, "greeting.txt", O_RDWR, 0644);
    glfs_write(fd, greet, strlen(greet), 0);
    glfs_close(fd);
    return 0;
}
$ gcc hello.c -lgfapi
$ ./a.out
まとめ
今回は GlusterFS の Go での開発環境を Docker で構築した際の流れを駆け足でご紹介しました。
今回はサーバ側でローカルマウントするようにしていますが、クライアント側でサーバ側のボリュームを FUSE マウントすれば別の用途でも使えるのではないかと考えています。
GlusterFS + Go という組み合わせにどれくらいの需要があるかは分かりませんが、何かのお役に立てれば幸いです。
お知らせ
ねこじゃらしでは Go に限らず Ruby や JavaScript のプログラマ、UI/UX デザイナを募集しております。
ご興味をお持ちいただけましたら、以下のリンクからお問い合わせください。